It's been about 6 months since I started receiving AIS signals using a RTL-SDR Blog v3 dongle. My station is decoding between 35 and 70 ships at any given time, depending on time of day and how many ships there are in San Francisco Bay.
The RTL-SDR Blog v3 dongle is a really inexpensive software-defined receiver. The "official" version costs about $25, and knockoff versions can be had for $10 or less. However, there's a reason why knockoff versions are less than half price, they use very cheap components and drift like crazy. I have several friends who bought the cheap version only to find that they just don't work, then purchased another knockoff that also didn't work. So save yourself the hassle and just buy a real one.

The very old laptop I was running rtl-ais and kplex on was starting to die, with several unknown kernel panics over a few days. I purchased a new shack computer, but wanting to keep the base OS clean, I decided to play around with containerizing rtl-ais and kplex.
Containerization is a way to decouple the application from the underlying operating system. Everything needed to run a particular application is included in the container, similar to a full-on virtual machine but without the operating system. Since all the dependencies and libraries are inside the container, you can easily copy a container to another computer and run it, as long as the host architecture (32-bit, 64-bit, arm, etc) is the same.
rtl-ais Docker Container
The rtl-ais package (cloned from dgiardini) receives AIS position beacons from ships. The output is one UDP packet for every decoded RF AIS packet.
I started this containerization project with building a dockerfile for rtl-sdr. After many failed builds, I eventaully got it working on my 64-bit shack computer. After realizing that the architecture difference meant that it wouldn't run on a Raspberry Pi, I then used buildx to build multi-architecture containers.
I then set up a Github Action to automatically build a multi-architecture container, and push the containers to the Github Container Registry. The Github Container Registry is very similar to docker hub, but entirely within the Github system.
From the README.md:
Now you can run rtl-ais in a docker container. No dependencies to install. Total container size is 55 to 75 MB, depending on the host architecture. Get/install docker here.
Two options for obtaining the container: Either download and run a pre-built container, or build the container locally.
Just to test things out:
docker run -it --rm --device=/dev/bus/usb ghcr.io/bklofas/rtl-ais:latest
- This downloads a pre-built container from the Github container registry.
- Architectures supported are i386, amd64, arm32v6, arm32v7, and arm64. Tested on amd64, arm32v7, and arm64. arm packages run on all RaspberryPi flavors. Your client will automatically download the appropriate architecture.
- This image will run by default
./rtl_ais -n, showing the received packets on STDOUT. Uses all other default values.- You can add other ./rtl-ais options, see below.
- Make sure at least one RTL-SDR dongle is connected.
- Startup messages and decoded packets will display in the terminal.
- Ctrl-C to kill.
- Using the
--rmflag will delete the container when you kill it. Otherwise, it will stay around until you prune.For a more permanent setup, run the container in the background and add any options you want:
docker run -d --name rtl-ais --restart=unless-stopped --log-driver=local --network=host --device=/dev/bus/usb ghcr.io/bklofas/rtl-ais:latest ./rtl_ais -n -d 00000002 -h 127.0.0.1 -P 10110
- -d: Start this container in daemon/background mode.
- --name: Name this anything you want.
- --restart=unless-stopped: Automatically restart the container if something happens (reboot, USB problem), unless you have manually stopped the container.
- --log-driver=local: By default, docker uses the json log driver which may fill up your harddrive, depending on how busy your station is.
locallog driver defaults to 100MB of saved logs, and automatically rotates them.- --network=host: Allows the container to talk to the internet, if you are sending the packets to an online service.
- --device=: Allows the container to talk to the USB bus to access the RTL-SDR dongle.
- ./rtl_ais: Same command-line options as non-containerized.
- View the startup messages and decoded packets with
docker logs --follow rtl-ais- Stop the container with
docker stop rtl-aisBuilding the container:
- Clone the repository with
git clone https://github.com/bklofas/rtl-ais.git, then from the folderdocker build -t rtl-ais .- Or, build the container without cloning the repository:
docker build https://github.com/bklofas/rtl-ais.gitOther tips and tricks:
- If you have the
-nflag, view the decoded AIS packets in real-time withdocker logs --follow rtl-ais- If you are only sending packets to one internet service (such as marinetraffic.com), you can use the
-hand-Poptions that they provide.- You are encouraged to send your decoded packets to multiple online services. Check out AIS packet multiplexer kplex, pre-built containers are available here.
kplex Docker Container
kplex is a NMEA 0183 multiplexer. It takes the single output (individual AIS frames from rtl-sdr) and sends copies to as many destinations as you want.
From the README:
kplex can now run in a Docker container. There are no dependencies to install, and nothing to build. The final image size is about 55 to 75 MB depending on the host architecture.
Two options for obtaining the container: Either download and run a pre-built container, or build the container locally.
Just to test things out on a pre-built container:
docker run -it --rm --network=host -v /home/user/kplex.conf:/etc/kplex.conf:ro ghcr.io/bklofas/kplex:latest
- This downloads a pre-built container from the Github container registry.
- Architectures supported are i386, amd64, arm32v6, arm32v7, and arm64. Tested on amd64, arm32v7, and arm64. arm packages run on all RaspberryPi flavors. Your client will automatically download the appropriate architecture.
- --network=host: Allows the container to talk to the internet, if you are sending the packets to an online service.
- -v /home/user/kplex.conf:/etc/kplex.conf:ro This mounts kplex.conf (from your home directory) into the container's /etc folder (read-only), when the container is started. kplex looks in /etc for configuration files during startup.
- To add command-line options, add ./kplex [OPTIONS] on the end.
- Ctrl-C to kill the container.
- Using the --rm flag will delete the container when you kill it. Otherwise, it will stay around until you prune.
For a more permanent setup, run the container in the background:
docker run -d --name kplex --restart=unless-stopped --log-driver=local --network=host -v ~/kplex.conf:/etc/kplex.conf:ro ghcr.io/bklofas/kplex:latest ./kplex -d 4
- -d: Start this container in daemon/background mode.
- --name: Name this anything you want.
- --restart=unless-stopped: Automatically restart the container if something happens (reboot, USB problem), unless you have manually stopped the container.
- --log-driver=local: By default, docker uses the json log driver which may fill up your harddrive, depending on how busy your station is. local log driver defaults to 100MB of saved logs, and automatically rotates them.
- ./kplex -d 4: Debug command line options. Optional if all the configuration is in the kplex.conf file.
- After you make any edits to kplex.conf, reload the container with
docker restart kplex.- If you want to bring real serial devices into the container, add
--device=/dev/ttyS0to the command line- For USB-serial devices, you could use
--device=/dev/ttyUSB0or similar, but it's probably better to specify the USB devices by ID. Look in /dev/serial/by-id, and add--device=/dev/serial/by-id/usb-Prolific_Tech...or similar. This will ensure the same device is used across reboots. Use the same path in the kplex.conf file. For example:
[serial]
filename=/dev/ttyS0   or /dev/ttyUSB0   or /dev/serial/by-id/usb-Prolific_Tech....
direction=in
baud=4800
- View the startup messages (if any) and output with
docker logs --follow kplex.- Stop the container with
docker stop kplex.Building the container:
- Clone the repository with
git clone https://github.com/stripydog/kplex.git, then from that folderdocker build -t kplex:1.0 .- Or, build the container without cloning the repository:
docker build https://github.com/stripydog/kplex.gitOther tips and tricks:
- If you have this [file] STDOUT directive in your kplex.conf file, you can see the individual AIS packets with "docker logs --follow kplex".
[file]
filename=-
direction=out
kplex Configuration File
Unlike rtl-ais, kplex requires a configuration file to run. It gets loaded from your home folder into /etc inside the container when started with the v ~/kplex.conf:/etc/kplex.conf:ro option.
Here's my personal kplex configuration file. The first section is the input from the SDR, the middle two sections are output to two AIS packet aggregators, marinetraffic.com and vesselfinder.com, and the last section puts each packet on standard out, which shows up when running the docker logs --follow kplex command.
[udp]
name=RTLSDR_ais
address=127.0.0.1
port=10110
direction=in

[udp]
name=MarineTraffic
address=5.9.XXX.XXX
port=XXX
direction=out

[udp]
name=vesselfinder.com
address=195.201.XXX.XXX
port=XXX
direction=out

[file]
filename=-
direction=out
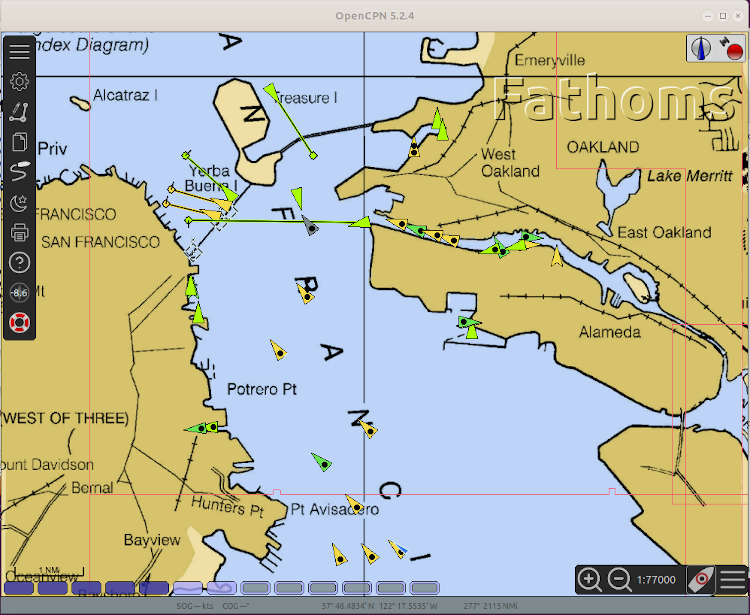
Local Map Display
If you add another output to the kplex.conf file, you can display the received packets on a local mapping program, such as OpenCPN. Example configuration:
[udp]
name=OpenCPN
address=127.0.0.1
port=10111
direction=out
It's important to use a different port number on localhost than the input from rtl-ais.